I had the GitHub MCP server configured four times. Once in Claude Code, once in VS Code, once in Cursor, once in Claude Desktop. Four JSON files, four copies of the same personal access token, and four slightly different npx versions — because each client had pulled the package on a different day. When the token rotated, I found out which clients I’d forgotten by watching them fail.
Docker MCP Toolkit fixes this by pulling MCP servers out of the individual clients. Servers run as containers and are grouped into profiles. Every client talks to one process, the MCP Gateway. You configure a server once, store its secret once, and every client that points at the profile gets the same tools.
This post is about the ideas: what the four parts are — catalogs, profiles, the gateway, and clients — and why they’re shaped the way they are. The hands-on CLI walkthrough is in the companion post, Docker MCP Toolkit CLI: Commands You’ll Actually Use.
The Mental Model
Here’s the one diagram that makes the rest click:
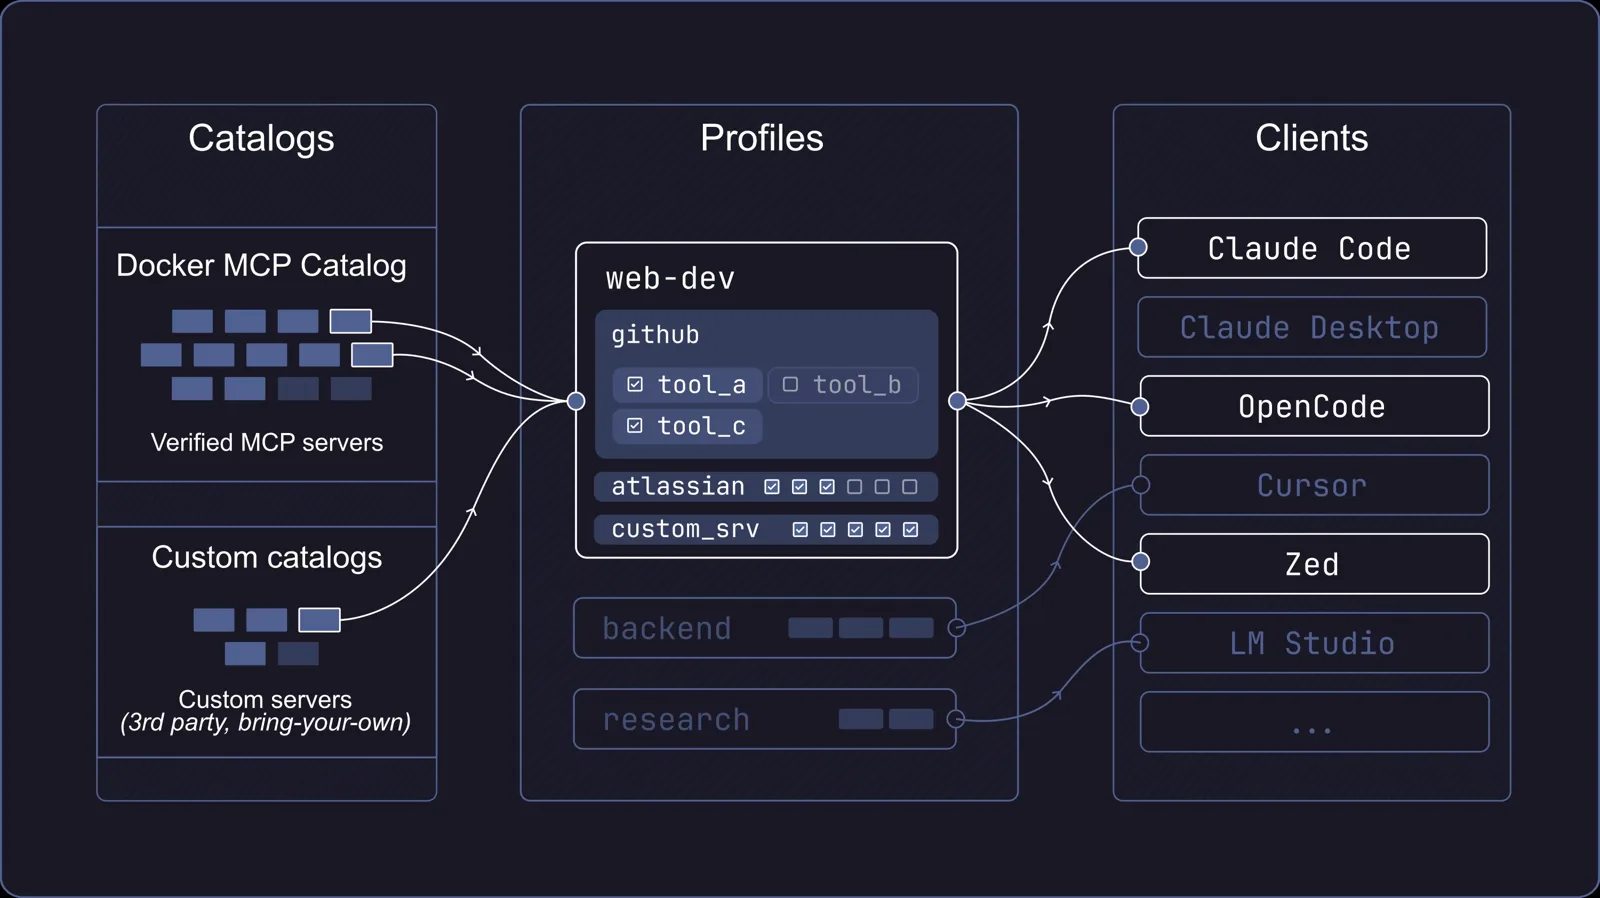 Source: Docker documentation
- Catalog — the library. It lists the MCP servers you can use: Docker’s official catalog, or a custom one your org curates.
- Profile — the toolbox. It’s a named set of servers you do use, plus their config and a per-tool allowlist.
- Gateway — the runtime. It’s one MCP server that starts server containers on demand, injects credentials, and routes tool calls.
- Client — Claude Code, VS Code, Cursor, Zed, and so on. Each one sees a single MCP server called
MCP_DOCKER.
Notice the arrows go one way. Clients never talk to individual servers. That one fact is where most of the Toolkit’s value comes from.
Enabling the Toolkit
The Toolkit ships with Docker Desktop and is still labelled Beta. On Docker Desktop 4.62+, go to Settings → Beta features, tick Enable Docker MCP Toolkit, and select Apply.
That adds an MCP Toolkit page to Desktop with three tabs — Catalog, Profiles, and Clients — which line up with the components below. It also installs the docker mcp CLI plugin, which the companion post covers.
Component 1: The Catalog
The Docker MCP Catalog is a curated set of MCP servers — 314 of them when I last checked. Each is either packaged as a Docker image or points to a hosted remote endpoint. Docker builds and signs the images under the mcp/ namespace and ships each with an SBOM, so provenance comes built in rather than being something you check afterwards.
The catalog holds two kinds of server:
| Type | Runs where | Example | Auth |
|---|---|---|---|
| Local (image) | A container on your machine | Sequential Thinking, Playwright | Secrets from the OS keychain |
| Remote | The provider’s infrastructure | Context7, GitHub, Notion, Linear | API key or OAuth (handled by the Toolkit) |
Local servers keep working offline once the image is pulled, and your data stays on your machine. Remote servers trade that for zero local footprint. The nice part is that a profile can mix both, and the client never knows which is which.
A server can come from more places than Docker’s catalog, too: any Docker image that speaks MCP, the community MCP registry, or a local YAML definition. That matters for teams — your internal MCP server becomes just another image in your registry.
Custom catalogs
314 servers is great for exploring and a lot to vet for an enterprise. Custom catalogs let a platform team publish an approved subset, plus their own private servers, as an OCI artifact. Developers import it in Desktop (Catalog → Import catalog), and the gateway can be locked to it so nothing outside the list is reachable.
Component 2: Profiles
A profile is a named collection of servers with their configuration. Think web-dev (GitHub + Playwright), data (Postgres + a charting server), research (Context7 + Sequential Thinking). Different clients can connect to different profiles at the same time.
If you’re upgrading from an older Toolkit, your existing servers were migrated into a profile called default.
In Desktop, you create one from MCP Toolkit → Profiles → Create profile, then fill it from the Catalog tab: tick servers, select Add to, and pick the profile. Servers that need setup show a Configuration Required badge until you fill in their settings.
Opening a profile gives you two tabs:
- Overview — its servers, their secrets, and which clients are connected.
- Tools — every tool the profile exposes, each with its own toggle.
Tool allowlists: the feature I didn’t know I needed
That Tools tab is easy to skip past. Don’t. You can switch off individual tools, not just whole servers, and this matters more than it sounds. Every tool definition takes up context-window tokens, and some tools (delete_repository, anyone?) you never want an agent to call. A GitHub server with dozens of tools becomes the three read-only ones you actually use.
Secrets and OAuth
Secrets don’t live in the profile. They live in your OS keychain (Windows Credential Manager, macOS Keychain), and the gateway injects them only when a tool is called. The value never appears in any client config file.
Remote servers that use OAuth — GitHub, Notion, Linear — get a browser-based authorize flow from the server’s Configuration tab. You can revoke access at any time from the OAuth tab.
One caveat: OAuth credentials are shared across all profiles. If your work and personal profiles both use the GitHub remote server with different accounts, you have to re-authorize when you switch. That’s by design, but it catches people out.
Sharing profiles
Profiles are shareable in two ways. You can push one to any OCI registry and version it like an image. Or you can export it to a file and commit it next to your code, so anyone who clones the repo can import the same toolbox.
Either way, credentials are never included. Each teammate sets their own secrets and OAuth. The export does include a full snapshot of each server — tool schemas, pinned image digests, and secret names (not values) — so review the diff before committing, the same as you would for a lockfile.
It’s a lot like how dev containers standardised the build environment. This standardises the agent’s toolbox.
Component 3: The MCP Gateway
The MCP Gateway is the open-source part that does the actual work. It runs in the background whenever the Toolkit is enabled. When a client calls a tool, the gateway:
- works out which server owns that tool,
- starts the server’s container if it isn’t running,
- injects credentials and applies security restrictions,
- forwards the request and returns the result.
The security model
Step 3 is the interesting one. When I watched the gateway start up, every local server was launched with the same set of restrictions:
- Thrown away after use — no state builds up between calls.
- No privilege escalation inside the container.
- 1 CPU and 2 GB of memory per server — a runaway server can’t take over your machine.
- Image pinned by digest and signature-verified — you run exactly what Docker signed.
- No host filesystem access unless you explicitly grant a mount for that server.
- Secrets intercepted — requests carrying sensitive data are blocked before they reach a tool.
Compare that with npx some-mcp-server, which runs with your full user permissions, your whole home directory, and whatever version npm resolved that morning.
Security note: The gateway normally talks to clients over stdio, which is only reachable by the local process that launched it. It can also serve over HTTP. If you go that route, keep it bound to localhost with its auth token enabled. A gateway exposed on a shared network is a remote-code-execution endpoint with your credentials attached.
Dynamic MCP: agents that install their own tools
Next to your profile’s tools, the gateway also exposes a few management tools — mcp-find, mcp-add, mcp-remove, mcp-config-set, and an experimental code-mode. This is Dynamic MCP, and it’s on by default.
So you can ask your agent “What MCP servers can I use for working with SQL databases?”, then “Add the postgres mcp server”, and it will. Servers added this way last only for the session. They aren’t saved to the profile.
It’s handy. It’s also an agent choosing which third-party code to run on your machine. The container sandbox limits the damage, but if that bothers you (it should, a little), lock the gateway to a curated custom catalog. Then the agent can only find what your team has approved.
Component 4: Clients
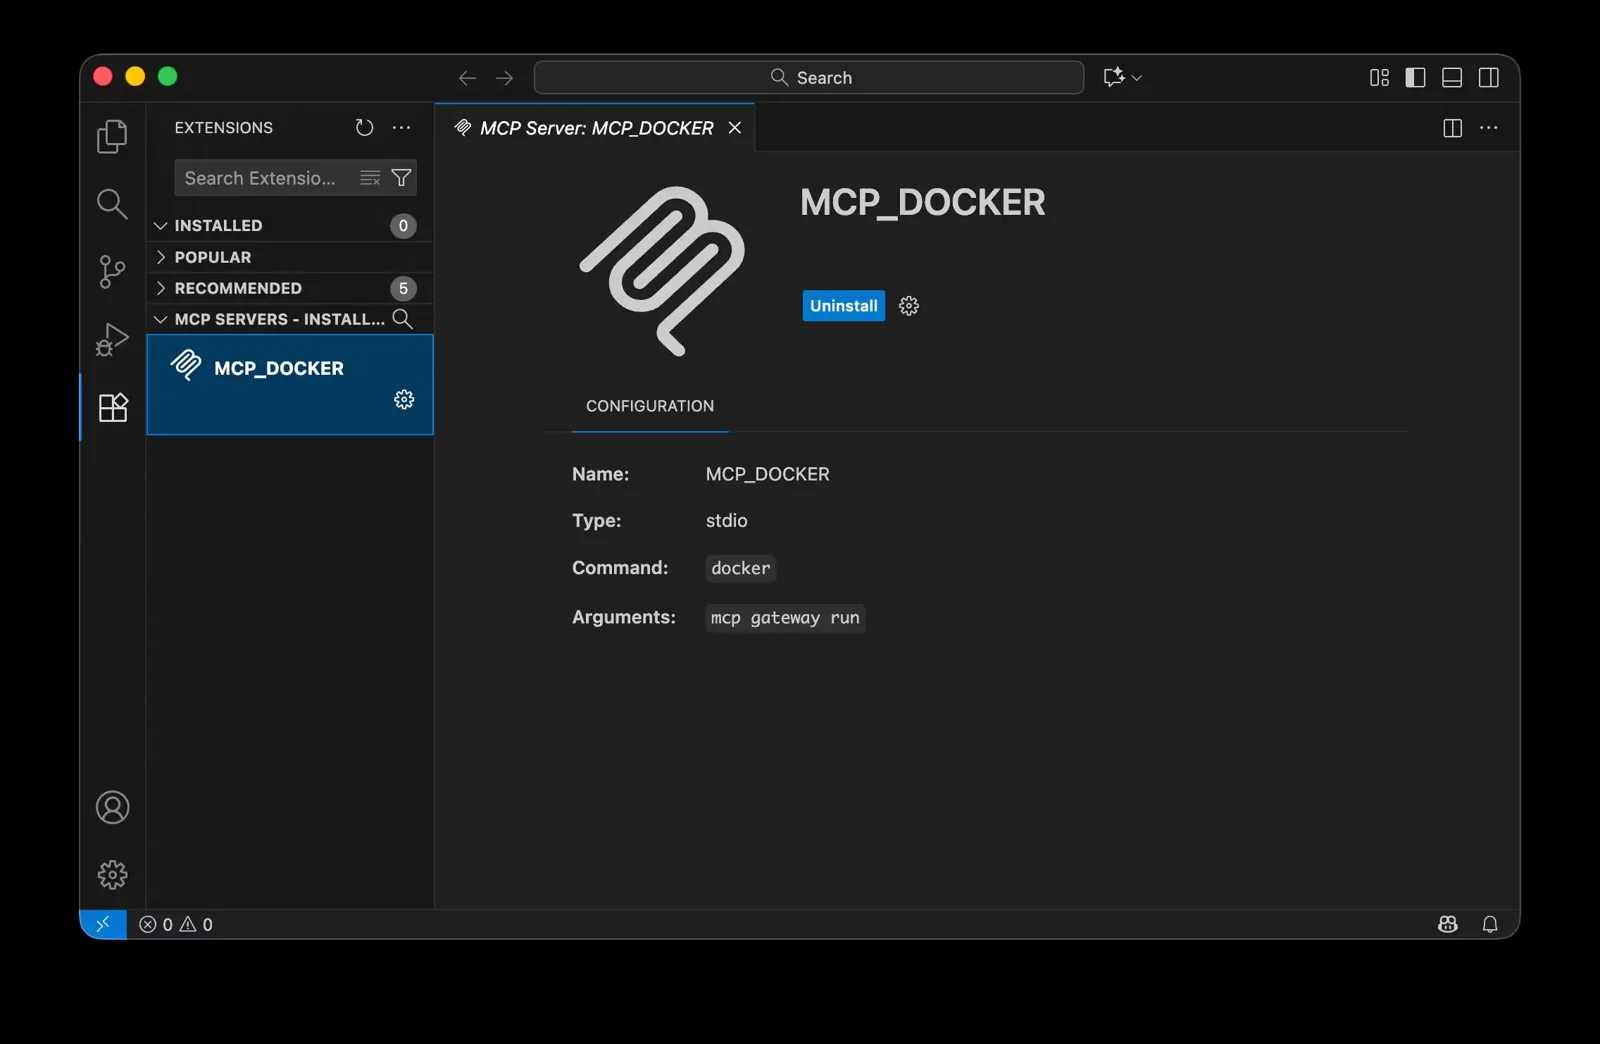
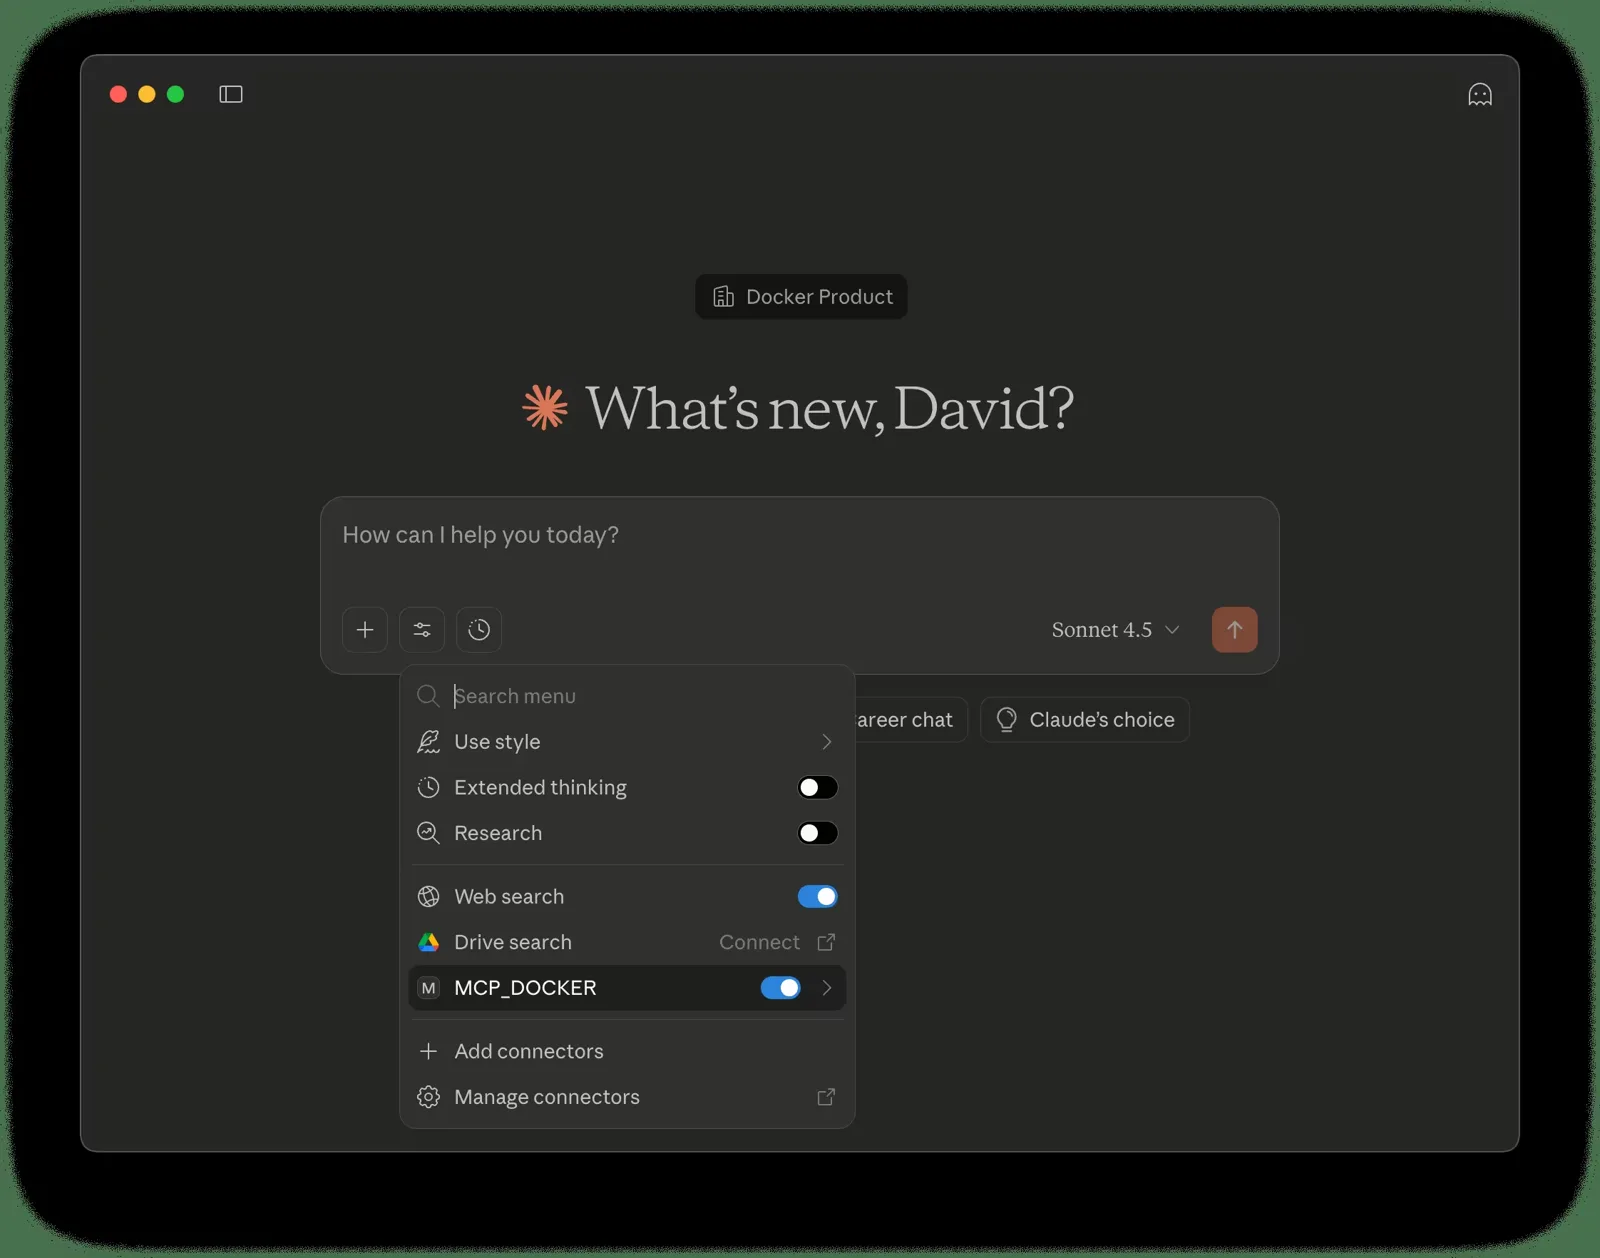
From the client’s side, the whole Toolkit is one stdio MCP server named MCP_DOCKER, launched with a profile name. That’s it. To switch toolboxes, a client changes which profile it asks for — nothing else about its config changes.
For supported clients — Claude Code, Claude Desktop, VS Code, Cursor, Zed, Codex, Gemini CLI, Goose, LM Studio, and more — the Clients tab in Desktop has a Connect button that writes the config for you. Anything else can be wired up by hand with a few lines of JSON.
 Source: Docker documentation
 Source: Docker documentation
Once it’s connected, test it with a prompt that needs one of your servers — “Use the GitHub MCP server to show me my open pull requests” works well in Claude Code.
Gotchas I Hit
- A profile’s ID isn’t always its name. Hyphens in the name become underscores in the ID. Use underscores from the start.
- OAuth is global across profiles. Two GitHub accounts means re-authorizing when you switch.
- Project-level client config is per-user. VS Code’s generated
.vscode/mcp.jsonbelongs in.gitignore. Commit the exported profile instead. - Heavy servers hit the 2 GB cap. Browser automation servers may need more memory.
- Beta means beta. The UI changed a lot in Desktop 4.62, so older tutorials (and screenshots) may not match what you see.
Wrapping Up
Going back to my four-copies-of-a-token problem: I now have one secret in the keychain, two profiles (web_dev and research), and every client points at the gateway with a profile name. When a token rotates, I update it in one place. When a server updates, I update it once, pinned by digest and signature-verified. And every tool call runs in a throwaway container with a CPU and memory cap, not with my full user permissions.
Ready to set it up? The companion post, Docker MCP Toolkit CLI: Commands You’ll Actually Use, has every command for profiles, servers, secrets, the gateway, and custom catalogs.
Next, I want to package one of my own .NET tools as an MCP server image and publish it through a custom catalog. Stay tuned.